Pin It
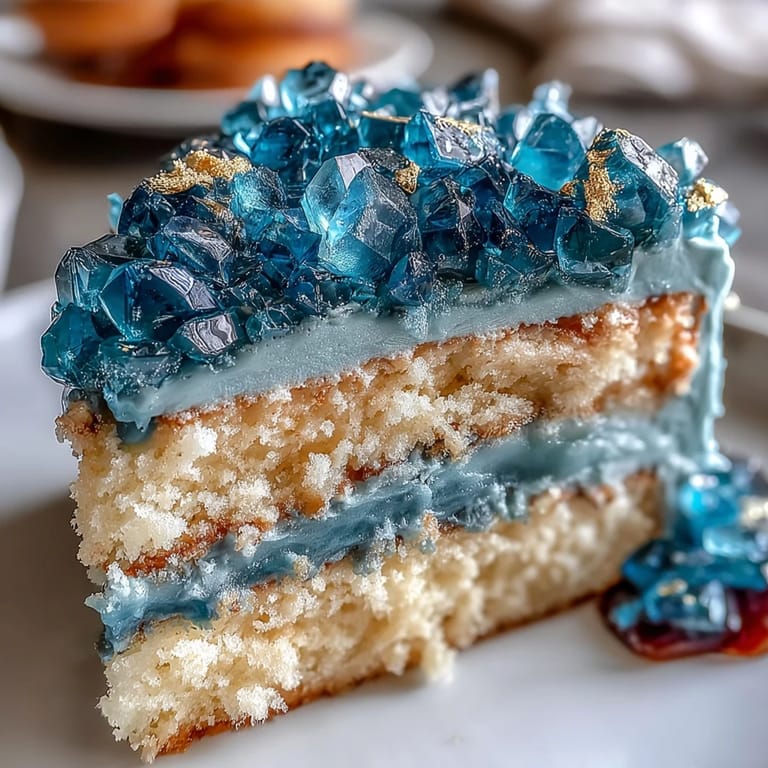
 The scent of vanilla always fills my kitchen whenever I bake, but the first time I tackled a geode graduation cake was a revelation: vibrant colors and childhood audacity meeting grown-up accomplishment. I can still picture my hands trembling as I painted gold onto sugar crystals, not because I was nervous, but because excitement threatened to spill over the boundaries of finesse. Sometimes, baking feels less like following a recipe and more like orchestrating a tiny, edible celebration. The teal and gold combination isn’t just striking—watching people’s faces light up as you slice reveals how much beauty matters at a milestone. I discovered this design while searching for ways to make a graduation cake feel both unique and worthy of the moment, and it immediately turned the usual into something dazzling.
The first time I made this for my cousin’s graduation, I had my little niece underfoot, desperately dabbing buttercream onto a spoon and sneaking sugar crystals behind my back. We laughed as I nearly dropped edible gold leaf—turns out, shimmering cake art attracts all ages and a lot of playful commentary. By the time the kitchen wound down, everyone was clustered around the cake, debating which slice looked most like a real geode. I’ll never forget the gratifying hush when I carved the wedge, revealing the teal sparkle inside. Those moments of shared admiration feel almost as sweet as the cake itself.
Ingredients
- All-purpose flour: Weigh your flour for accuracy—it’s the backbone for a tender crumb and prevents heaviness.
- Baking powder: If yours is older than six months, replace it so your cakes rise high and remain light.
- Salt: Just a pinch, but skipping this mutes flavor and leaves cake flat.
- Unsalted butter: Room temperature butter is crucial; cold butter won’t cream properly and can affect texture.
- Granulated sugar: Creaming sugar and butter until fluffy gives height and a fine crumb, so don’t rush this step.
- Eggs: Let them sit out so they blend smoothly without splitting; cold eggs can result in a dense batter.
- Vanilla extract: Real vanilla, not imitation, makes the cake fragrance linger in every bite.
- Whole milk: Use fresh milk—it helps balance richness and keeps the cake moist.
- Powdered sugar: Sifted sugar prevents lumpy buttercream and delivers silky smooth spreads.
- Heavy cream or milk: Adjust this to change the buttercream consistency—too little and it’s stiff, too much and it slides.
- Teal gel food coloring: Gel gives strong color without watering down the frosting or crystals.
- Rock sugar crystals: Clear crystals catch light beautifully, but feel free to mix hues for extra dramatic effect.
- Edible gold leaf or gold luster dust: Gold accents create the magic—use a food-safe brush for crisp edges.
- Simple syrup: Brushing layers lightly keeps them moist through decorating, but don’t overdo or you risk sogginess.
Tired of Takeout? 🥡
Get 10 meals you can make faster than delivery arrives. Seriously.
One email. No spam. Unsubscribe anytime.
Instructions
- Cake Prep:
- Preheat your oven and line your pans, then whisk together the dry ingredients for a base that will stay fluffy and light. Cream the butter and sugar until the mixture is pale, then beat in eggs and vanilla until blended and aromatic.
- Batter Assembly:
- Alternate dry ingredients and milk, mixing slow and steady so the batter stays smooth—watch for texture changes to avoid lumps. Pour evenly into pans, smoothing the top gently for even baking.
- Bake & Cool:
- Bake until the edges smell fragrant and a toothpick comes out clean, then cool on racks while the kitchen fills with vanilla warmth. Let them rest fully before decorating.
- Buttercream Magic:
- Beat butter until creamy, then gradually sift in powdered sugar and a dash of vanilla; add cream for a perfectly spreadable finish. Tint most buttercream teal, keeping a little aside for the crumb coat.
- Sugar Crystal Prep:
- Tumble sugar crystals in a bowl, drop in gel coloring, and toss gently until each bit gleams—let dry to avoid sticky clumps.
- Cake Assembly:
- Level layers and brush lightly with syrup, then stack with buttercream between, applying a crumb coat and chilling briefly for firm edges. Frost in teal until the sides and top are velvety smooth.
- Geode Creation:
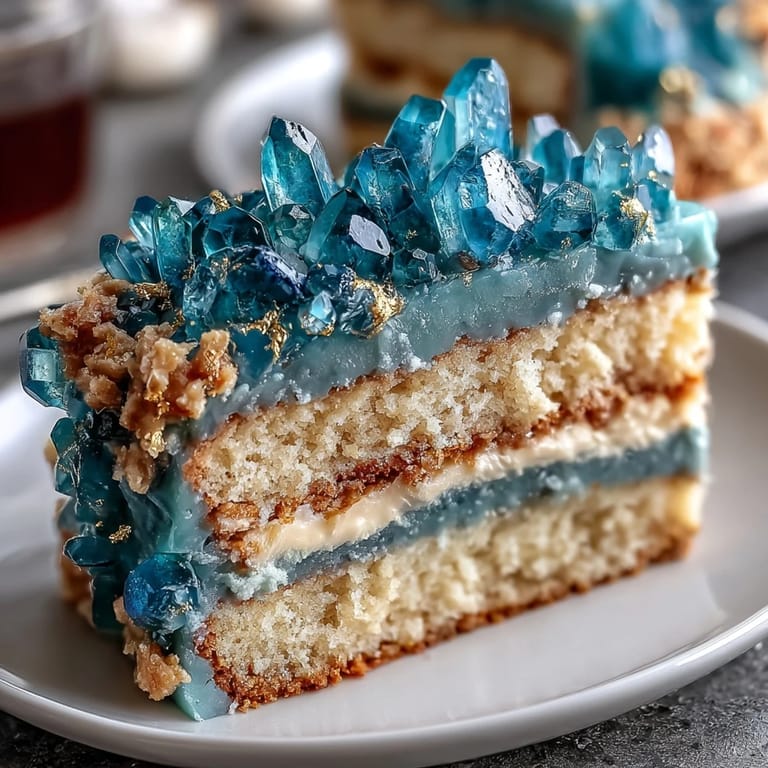
- Carve a wedge into the cake’s side, then spread buttercream inside before pressing colored crystals for a dazzling geode effect. Use lighter crystals in the center and dark on the edge, finishing by painting borders with edible gold.
- Final Touches:
- Add gold flourishes and a graduation topper, taking a deep breath to admire your handiwork before presenting the cake.
 Pin It
 There was a moment, just before serving, when the whole room paused as I sliced the sparkling geode wedge. The cake became a storytelling piece—the celebration suddenly felt richer than any diploma in hand, and people lingered, savoring the drama as much as the taste.
How to Paint Gold Edges Like a Pro
Using a food-safe brush dipped in gold luster dust mixed with a bit of clear alcohol (vodka works brilliantly) allowed me to achieve crisp, magical outlines. Try gentle, deliberate strokes and dab extra gold only where crystal clusters are most dense—the shimmer stands out under party lights.
Choosing Your Graduation Topper
There’s something truly satisfying about customizing your topper—school logo, mortarboard, or just a flourish of gold. The topper isn’t only decoration; it’s a finishing touch, so choose one that matches the vibe (playful, sophisticated, or super personalized).
Troubleshooting Buttercream and Crystal Placement
If the buttercream feels too soft, chill it for a few minutes and stir again—this makes crystal placement tidy and keeps the geode from drooping. Working with sugar crystals is easier in small batches, so don’t rush or dump them all at once. Spread gently and press only until they stick; too much force can dent your buttercream and ruin the design.
- If crystals fall off, lightly press extra buttercream in to help anchor them.
- Don’t be afraid to rearrange crystals until you love the look.
- Make sure your hands are clean and dry—sugar crystals melt fast if handled too long.
 Pin It
 May your graduation cake sparkle just as much as the new chapter ahead& Treasure those admiring glances—they’re as sweet as every bite.
Recipe FAQs
- → How do I get the teal geode effect?
Tint rock sugar crystals with teal food coloring, then press them into a wedge-shaped cutout in the cake, layering lighter and darker crystals for depth.
- → Can I use different cake flavors?
Yes, vanilla cake can be infused with citrus or almond extracts, or substitute with chocolate for a richer base.
- → What tools are needed for decorating?
Essential tools include round cake pans, an offset spatula, electric mixer, parchment paper, serrated knife, and food-safe paintbrush.
- → Is the gold decoration edible?
Absolutely. Use edible gold leaf or gold luster dust mixed with clear alcohol for safe, vibrant gold accents.
- → How do I keep the cake moist?
Brush each cake layer with simple syrup before stacking. This technique helps retain moisture and enhances flavor.
- → Is this suitable for vegetarians?
Yes. The cake base and decorations use vegetarian ingredients, but always check additive labels for sugar and colors.