 Pin It
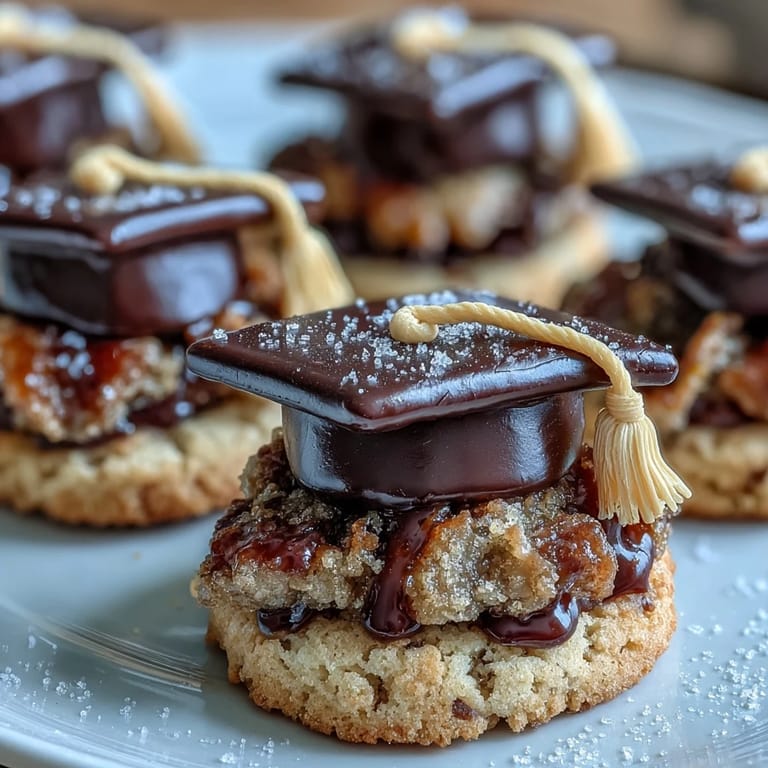
 My sister called me three weeks before her graduation in a panic—she'd committed to bringing treats for the whole class, but had no idea what to make. I found myself scrolling through cookie decorating videos at midnight, and that's when I saw it: a simple square cookie transformed into a tiny graduation cap with black icing and a yellow tassel. By the time she walked across that stage, we'd made hundreds of these together, laughing through piping mistakes and celebrating with each perfectly decorated batch.
I'll never forget watching my mom carefully arrange these cookies on a tiered stand for my cousin's party—she kept adjusting them like they were tiny treasures, and honestly, they kind of were. One guest took a photo of the whole display before eating a single cookie, which tells you everything about how special they look.
Ingredients
- All-purpose flour (2 1/2 cups): The foundation of a crisp, buttery cookie that holds its shape beautifully when you cut out those graduation cap shapes.
- Unsalted butter (3/4 cup, softened): Room temperature is non-negotiable here—cold butter won't cream properly and your dough will be grainy instead of light.
- Granulated sugar (1 cup): This is what gives the cookies their slight snap and delicate crumb texture.
- Egg (1 large): Acts as the binding agent; make sure it's at room temperature so it incorporates smoothly.
- Baking powder (1/2 teaspoon): Just enough lift to keep these cookies tender without making them cakey.
- Vanilla extract (2 teaspoons): Use the real stuff—it makes a noticeable difference in flavor.
- Salt (1/4 teaspoon): Balances the sweetness and enhances the buttery taste.
- Powdered sugar for royal icing (3 cups, sifted): Always sift it first or your icing will have lumps that clog your piping bag.
- Egg whites (2 large) or meringue powder: Egg whites make the most luxurious icing, but meringue powder is safer if you're concerned about raw eggs.
- Black and yellow gel food coloring: Gel coloring is thicker and won't thin out your icing like liquid coloring does.
- Mini M&Ms or candy pearls: These become the tassels—the tiny detail that makes people do a double-take.
Tired of Takeout? 🥡
Get 10 meals you can make faster than delivery arrives. Seriously.
One email. No spam. Unsubscribe anytime.
Instructions
- Mix your dry ingredients together:
- Whisk flour, baking powder, and salt in a bowl until everything is evenly distributed. This prevents lumps when you fold the dry mixture into the wet ingredients.
- Cream the butter and sugar until fluffy:
- Beat them together for 2 to 3 minutes until the mixture is pale and airy—this is what creates tender cookies with a delicate crumb. Stop occasionally and scrape down the bowl so everything combines evenly.
- Add the egg and vanilla:
- Mix just until combined—you're not trying to whip air into this anymore, just incorporate the liquid ingredients smoothly.
- Fold in the flour mixture gently:
- Add the dry ingredients gradually while mixing on low speed, stopping as soon as you don't see streaks of flour. Overmixing leads to tough cookies.
- Chill the dough:
- Divide it into two disks, wrap in plastic, and refrigerate for 30 minutes. Cold dough is much easier to roll and cut without sticking.
- Preheat and roll:
- Set your oven to 350°F (180°C). On a lightly floured surface, roll the dough to about 1/4-inch thickness—this is thin enough to be crispy but thick enough not to burn.
- Cut and bake:
- Use a graduation cap cutter or square cutter to shape your cookies, place them on parchment paper, and bake for 8 to 10 minutes until the edges are just golden. The centers should still look slightly underbaked—they'll set as they cool.
- Make the royal icing:
- Beat egg whites (or meringue powder mixed with water) until foamy, then gradually add sifted powdered sugar while beating. After about 5 minutes, you should have stiff, glossy peaks that hold their shape.
- Color and adjust consistency:
- Divide the icing—tint most of it black and a small portion yellow. Add water by the teaspoon if you need it thinner for flooding, or extra powdered sugar if you need it thicker for piping.
- Outline and flood with black icing:
- Using a piping bag, outline each cookie's edges with black icing, then flood the center with thinner icing and use a toothpick to smooth it to the edges. Let this set for 30 to 60 minutes until completely dry.
- Pipe the yellow tassel and button:
- Once the black icing is set, pipe a small yellow tassel and button onto the top corner of each cap. Top the tassel with a mini M&M or candy pearl.
- Let them cure completely:
- These need several hours or overnight to dry fully before you serve or package them. Patience here means no smudging.
 Pin It
 The moment that stands out to me isn't the decorating itself, but watching someone bite into one of these cookies for the first time and discover that beneath the beautiful black royal icing is a crisp, buttery cookie that actually tastes incredible. That combination of visual wow and genuine deliciousness is what keeps people asking for the recipe.
Timing Your Baking and Decorating
One thing I learned the hard way is not to rush this process. I once tried decorating warm cookies and the icing melted right off—disaster. The cookies need to be completely cool before you even touch them with icing, and then the black base layer needs solid drying time before you pipe the yellow details on top. If you're making these for an event, bake them 2 days ahead and decorate the day before. This takes the pressure off and guarantees they'll look flawless.
Shortcuts That Actually Work
If decorating feels intimidating, know that store-bought royal icing exists and it works beautifully. You can also simplify the design—skip the tassel entirely and just paint the whole cap black with a simple yellow button, and nobody will think less of you. The cookies themselves are what matter, and they're foolproof if you follow the mixing instructions carefully.
Customizing for Your Celebration
These cookies are incredibly versatile once you understand the basic technique. I've made them in school colors by swapping the black for navy or deep purple, and used different colored candies for the tassels. You could pipe the graduate's initials in gold, or add a tiny diploma shape with thin royal icing lines. The design is up to you, which makes them feel personal to whoever you're celebrating.
- Use school colors instead of black and gold to make them even more special.
- Try natural food colorings like squid ink for black if you prefer avoiding gel colors.
- Bake the cookies ahead and freeze them unfrosted for up to 2 weeks.
 Pin It
 These cookies have a way of becoming the memory itself rather than just part of the celebration. They're worth the effort, and somehow every batch tastes like pride mixed with butter.
Recipe FAQs
- → How do I achieve a smooth royal icing finish?
Beat egg whites or meringue powder with powdered sugar until stiff peaks form. Adjust consistency with water for flooding or thickening for piping to ensure a smooth and glossy finish.
- → Can I substitute gel food coloring for natural dyes?
Yes, natural colorants such as turmeric for yellow or activated charcoal for black can be used, but colors might be less intense and affect taste slightly.
- → How thick should the cookie dough be rolled out?
Roll the dough to about 1/4 inch (6 mm) thickness for even baking that delivers a crisp yet tender bite.
- → What’s the best way to store decorated cookies?
Allow icing to dry completely, then store cookies in an airtight container at room temperature to keep them crisp and fresh.
- → Can these treats be prepared in advance?
You can bake the cookies up to two days ahead and decorate on the day you plan to serve them for optimal freshness and icing set.