 Pin It
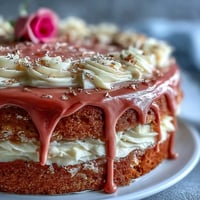
 My cousin's hands were shaking as she held her diploma, and I realized right then that I needed to bake something that matched the weight of the moment. The ombre cake came to life in my kitchen that week—four graduating shades of color stacked impossibly high, each layer a different intensity, like watching her grow from freshman to senior all over again. It wasn't just about the cake; it was about creating something that said everything I couldn't quite put into words.
I remember frosting this cake at midnight before the graduation party, my kitchen smelling like butter and vanilla, my hands aching but my heart completely full. The graduation cap topper went on last, and when I stepped back to look at the final result, I genuinely gasped—something I'd imagined had actually become real, and it was beautiful.
Ingredients
- All-purpose flour: This is your structural backbone, and measuring by weight (400 g) instead of cups gives you consistency that actually matters with layer cakes.
- Baking powder: Keep it fresh by replacing it every six months; old baking powder won't give you the rise you need for four tender layers.
- Unsalted butter: Room temperature is non-negotiable here—cold butter won't cream properly with the sugar, and your cake will be dense.
- Granulated sugar: This dissolves into the butter to create lift and structure; don't skip the creaming step thinking you can rush it.
- Room temperature eggs: They incorporate more smoothly into the batter, creating a more tender crumb than cold eggs would.
- Vanilla extract: Use real vanilla, not imitation; the flavor difference shows up in every bite.
- Whole milk: Bring it to room temperature so it doesn't shock the warm batter and create uneven mixing.
- Gel food coloring: Gel is essential because liquid coloring adds moisture and muddles your colors; buy it at baking supply stores or online.
- Egg whites for buttercream: Using them heated to 160°F kills any food safety concerns while creating that luxuriously smooth meringue.
- Unsalted butter for frosting: The quality here really shines because buttercream is mostly butter; splurge if you can.
Tired of Takeout? 🥡
Get 10 meals you can make faster than delivery arrives. Seriously.
One email. No spam. Unsubscribe anytime.
Instructions
- Prep your pans like you mean it:
- Grease all four pans thoroughly with butter or cooking spray, then line the bottoms with parchment circles. This prevents sticking disasters that ruin celebrations.
- Combine your dry ingredients:
- Whisking flour, baking powder, and salt together aerates the flour and distributes the leavening evenly. This small step prevents dense pockets in your final cake.
- Cream butter and sugar until fluffy:
- Beat them together for 3 to 5 minutes until the mixture is pale and light; this incorporates air that helps your cake rise beautifully. You'll feel the texture change under the mixer—that's your signal.
- Add eggs one at a time:
- Adding them individually ensures each egg fully incorporates before the next arrives. If you dump them all in at once, you risk a broken, curdled batter.
- Mix in vanilla extract:
- This takes just a moment but deepens the flavor of the entire cake.
- Alternate flour and milk:
- Start with flour, then milk, then flour again—this pattern keeps the batter from becoming greasy or overmixed. Stop as soon as everything is just combined; overmixing develops gluten and makes the cake tough.
- Divide and color your batter:
- Divide the batter evenly:
- Use a kitchen scale if you have one, or divide by eye into four bowls of equal size. Add gel coloring starting with the lightest shade and increasing the intensity with each bowl—this gradient is what creates that stunning ombre effect.
- Pour and bake:
- Pour each color into its pan, smooth the tops gently, and bake at 350°F until a toothpick comes out clean, about 22 to 25 minutes. Don't open the oven door before 20 minutes or you'll mess with the rise.
- Cool with patience:
- Let the cakes sit in their pans for 10 minutes so they set slightly, then turn them out onto wire racks to cool completely. This step prevents them from breaking apart when you stack them.
- Prepare your Swiss meringue buttercream:
- Combine egg whites and sugar in a heatproof bowl over simmering water, whisking constantly until the mixture reaches 160°F and feels smooth. This dissolves the sugar completely and pasteurizes the eggs.
- Whip until clouds form:
- Transfer to a mixer and beat on high until stiff peaks form and the bowl feels cool to the touch, usually about 10 minutes. This aeration creates that silky, light texture that makes Swiss meringue so superior.
- Add butter gradually:
- Add softened butter a few cubes at a time, mixing well after each addition. If the buttercream looks broken or curdled, don't panic—keep mixing and it will come together as it warms up.
- Tint if desired:
- Add vanilla and any gel coloring at the end, stirring gently so you don't deflate all that beautiful whipped air.
- Stack with intention:
- Place the darkest layer on your cake stand or plate, spread it generously with buttercream, and continue layering from darkest to lightest. This creates a natural ombre when viewed from the side.
- Apply your crumb coat:
- Spread a thin, even layer of buttercream over the entire cake, sealing in all the crumbs. Chill for 20 minutes so this layer sets and gives you a clean surface for the final frosting.
- Frost and decorate:
- Apply your final layer of buttercream, blending colors if you want a gradient effect, and add pearls, toppers, or piped details while your heart dictates. This is where the cake becomes truly yours.
- Final chill:
- Refrigerate until set, then bring to room temperature before serving so the flavors and texture shine.
 Pin It
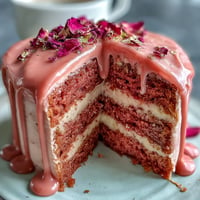
 When my cousin cut into that cake at her graduation party, the layers revealed themselves in perfect ombre stripes, and the room went quiet for just a second before everyone applauded. It became clear that night that some dishes transcend their own deliciousness—they become proof that someone spent time and intention on you.
Why Ombre Layers Matter
The visual impact of an ombre cake comes entirely from how you divide and color the batter, not from any complicated technique. The magic is in restraint—adding just slightly more color to each successive bowl creates a gradient that reads as intentional and sophisticated, not chaotic. I learned this after my first attempt, when I got overzealous with the coloring and ended up with one pale layer and three that were nearly identical dark shades. The second time, I kept notes next to my mixing bowls: lightest, light, medium, dark. This simple reference prevented me from second-guessing myself mid-coloring, and the result was worth every second of that tiny bit of planning.
Swiss Meringue Buttercream vs. American Buttercream
I used to make American buttercream for every occasion—just butter, powdered sugar, and milk beaten together—until I realized it was grainy on my tongue and too sweet for a cake this elegant. Swiss meringue changed everything because it starts with a heated base that dissolves the sugar completely, creating buttercream that's smooth, stable, and genuinely delicious. It holds up better under warm conditions, doesn't break as easily when you overmix it, and tastes less like frosting and more like silky butter. The egg whites scare people, but heating them to 160°F is a simple food safety measure that takes away that worry entirely.
Decorating Your Masterpiece
The decorating stage is where your cake becomes a reflection of the person you're celebrating, so let that guide your choices. I used edible gold pearls and a tiny graduation cap because those details spoke to my cousin's personality and the significance of the moment. Piping bags with decorative tips let you add borders, dots, or rosettes if you want to elevate it further, or you can keep it simple and let those ombre layers be the entire statement. The key is that whatever you choose should feel intentional, not overdone—this cake is already carrying a lot of visual weight with those four colored layers, so restraint in decoration actually makes it look more refined.
- Edible pearls look luxurious and catch light beautifully, making the cake photograph like a dream.
- A simple border piped around the top and bottom adds polish without needing advanced piping skills.
- Fresh flowers or greenery can add a natural touch, but make sure they're food-safe or use a barrier between them and the frosting.
 Pin It
 This cake exists in that beautiful space where technique and emotion meet, where the effort you put in becomes visible in every layer and every delicate shade of color. Make it for someone you love, and let the ombre layers tell the story of growth, celebration, and all the colors of a life well-lived.
Recipe FAQs
- → How do I achieve the perfect ombre gradient?
Use gel food coloring to tint each batter portion gradually, increasing the color intensity from lightest to darkest for smooth layering.
- → What is Swiss meringue buttercream?
It is a silky frosting made by gently heating egg whites and sugar, then whipping until stiff peaks form before adding butter for a smooth, stable finish.
- → Can I prepare the layers in advance?
Yes, bake the layers ahead and wrap them tightly in plastic wrap. Chill or freeze before assembling for convenience.
- → What tools help in decorating the cake?
Piping bags with decorative tips, offset spatulas, and edible decorations like pearls or toppers enhance the final presentation.
- → How to store the cake after assembly?
Keep the finished cake refrigerated in an airtight container, bringing it to room temperature before serving for best texture.